
Have you ever had plans to make something, and you’re so excited about it, but it ends up taking you two years to finally DO it?
That’s me and marquee letters. I’ve loved all of the awesome DIY marquees that other bloggers have done, and there are SO many different ways to create these marquees. There is the vintage marquee DIY and also the crazy adorable mini marquee from Oh Happy Day; the wooden marquee letter from Vintage Revival; and this wooden letters on beadboard DIY marquee from The Crafting Chicks.
I love them all! But, I don’t have a lot of time, little patience, and I only use power tools during the summer (true story).
So when I was finally ready to make my own marquee, I took inspiration from about a dozen different tutorials out there. It took me about 2 hours total, from start to finish, and here’s how my DIY marquee sign turned out:

What do you think? I admit: I was totally over the moon in LOVE once I plugged this baby in and BLISS lit up my office. Gotta love marquees! I want to make them for all of the rooms in our house now!
Here’s a quick tutorial of how I made my DIY marquee letters.
Table of Contents
EASY DIY MARQUEE LETTERS
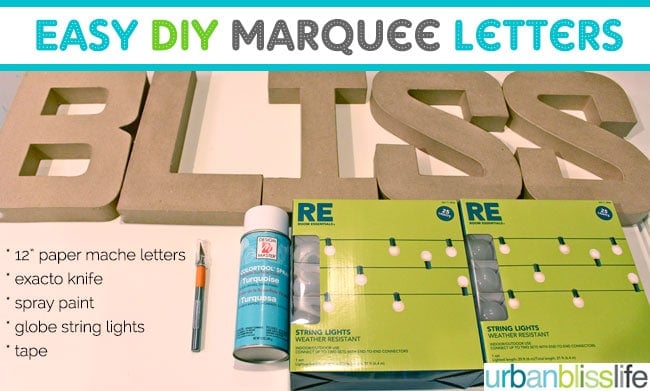
You’ll need just a few items:
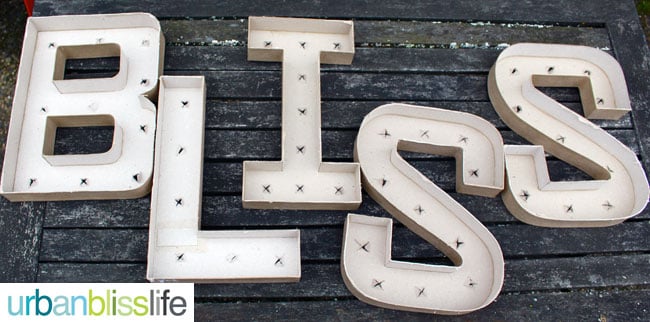
- 12″ paper mache letters (I got mine from Joann Fabrics; you can buy them online as well)
- X-acto knife
- Spray paint
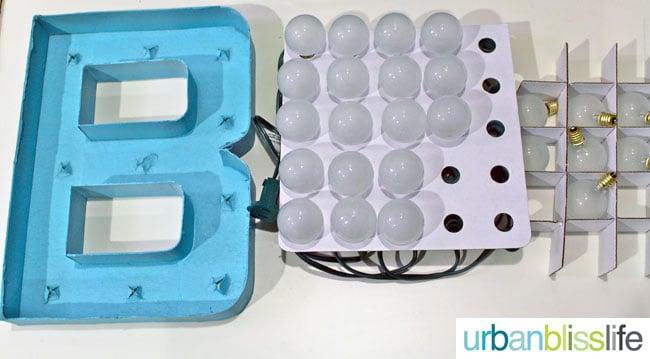
- Globe string lights (I got mine from Target)
- Tape (I used packaging tape)
Depending on how many letters you use and how big your letters are, you may need one, two, or even three sets of globe string lights. My BLISS DIY Marquee Letters used two sets exactly.
STEP 1: Using an X-acto knife, carefully start cutting out one side of each letter. Since these letters are hollow, once you start to cut, you’ll be surprised how easy the rest of the letter will come out.
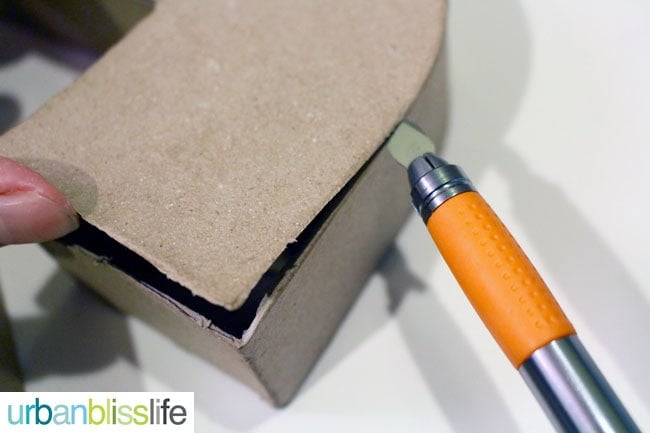
Once you are done with this first step, your letters will look like this: with the top taken off on the left (you can recycle that or use it for another project):
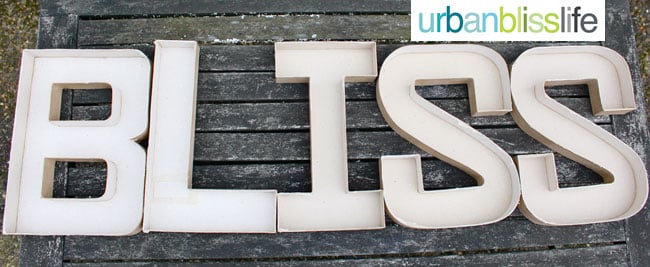
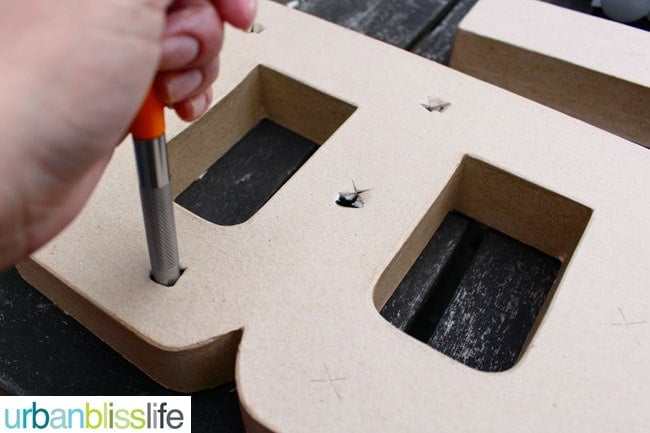
STEP 2: Using your X-acto knife, cut criss cross X’s where you want the bulbs to be. Take some time to strategize placement; you can even mark the X’s in pencil first if you want, then cut. Then, use the back rounded edge of your X-acto knife to push through those X’s, leaving a hole for the bulbs to eventually go through.
When you are done with this step, it will look like this:
STEP 3: Time to spray paint! Do this outside or in a well-ventilated space inside. I use big flattened old boxes as the base of my spray paint projects, but you can use a drop cloth or newspaper. Just be careful with newspaper, as it can stick to the letters if you use too much spray paint.
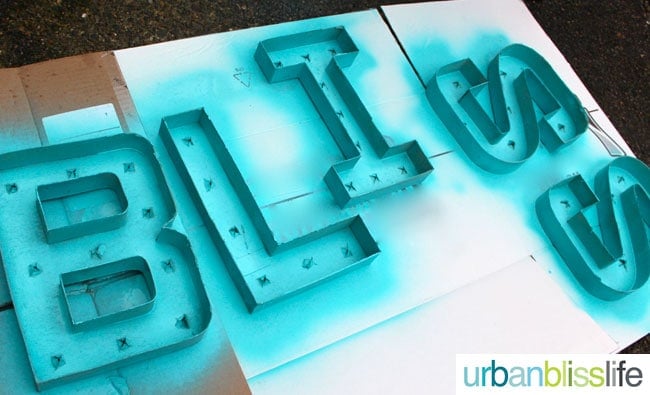
STEP 4: First, I want to note the color variances from the photo above and the photo below are from lighting issues. The blue is more of an aqua/turquoise as shown in the top photo, taken outdoors. Okay, moving on . . .
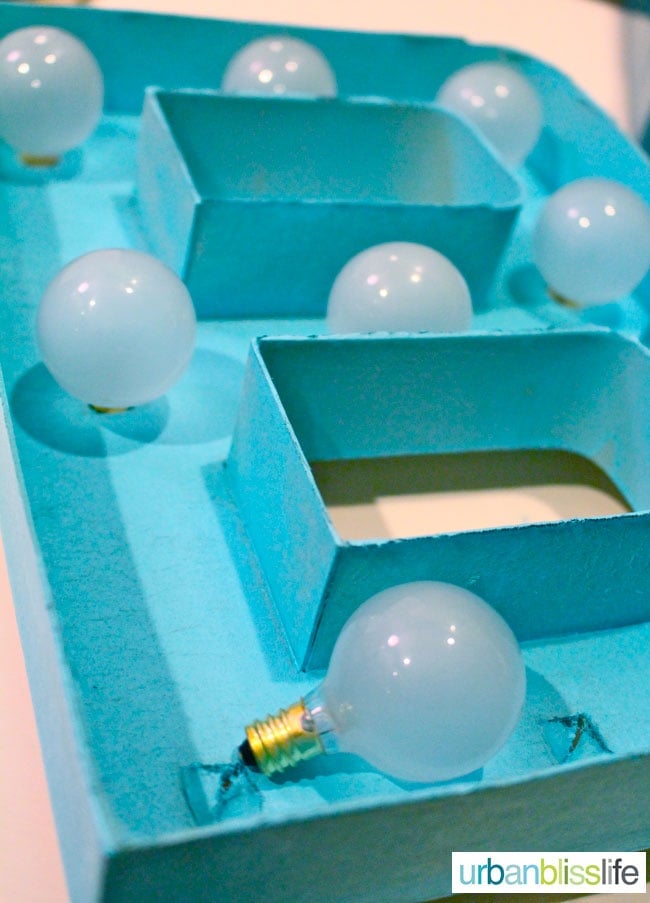
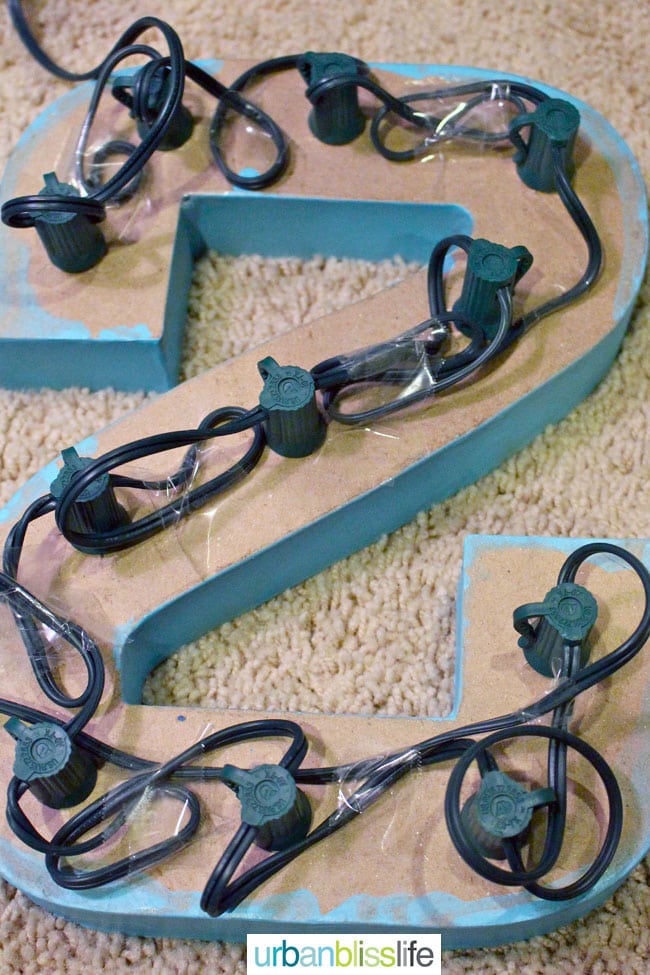
Next, it’s time to place the bulbs in. You will want to unscrew the bulbs from the string base first. I used the cardboard separator that came with the lights to hold the bulbs so they don’t wobble around all over the table and break.
You’ll gently push the string base through each cut hole, then screw bulbs back in. You might want to take a minute to strategize the flow of the string base, as you’ll want the string to move easily from one bulb to the next without having to criss cross the string. Does that make sense? Then, you’ll want to make sure the last bulb you put in for Letter #1 is at the bottom so that it seamlessly can move to the Letter #2 without too much or too little string.
I should have probably done a video tutorial for this. Ah well. Next time! ;)
STEP 5: Finally, I taped down the strings in the back as best as I could so that they wouldn’t all stick out of the sides. This is trickier than it looks. I used packaging tape but just use any sturdy tape you have.
Then all that is left for you to do is plug that beautiful baby in and stand back, basking in all its BLISSful DIY glory!

It really was easy to make and required no power tools!
What DIY Marquee Letters should I make next? Initials for our bedroom? PLAY for the backyard, so it can light up outdoor dinner parties? CHEERS for our kitchen/dining room? Hmm. . . so many possibilities! What would YOUR DIY Marquee letters spell out?
This post contains affiliate links.


how did you end up hanging these? Thanks in advance!
Hi Corey, so glad you made this and love it! I made these specifically to hang on a wall, and constructed as is, they wouldn’t stand straight on a table. You might want to try a string of smaller light bulbs that come with less wire, and that might allow you to tape the back up really well and have them stand up. That said, I’ve never done it before, so I can’t vouch for that idea :) The only other thing I can think of is to ensure the back is fully taped up, then staple gun the letters to a base of some sort that is secured well to the table. Good luck! Enjoy the wedding!
I just did these for my upcoming wedding and I love them! Any suggestions on how to stand them up to display them? We’re hoping to put them on the cake table.
Hi Wei! The lights are semi opaque globe lights, but they also come in clear. Click the links in the supply section in the post to get a direct link to these particular bulbs. Glad you love the tutorial!
Hi, wondering the lights you used, are the bulbs clear glass? In the photo they look semi-opaque. Thanks and love the tutorial!
I’m finally coming back to this project (doing a redo on the girls room design because why not make life more complicated with a newborn?) Thank you for still having it featured!
Hi Lauren! That is a GREAT question. These are definitely not meant to be turned on for long periods of time. The longest I had the lights turned on was for one hour, and the letters were fine. However, you could use LED lights – they give off minimal heat compared to regular bulbs. I would also make sure you don’t leave the lights on for too long, regardless of which bulbs you use, and of course, never leave them on unattended :) I am sure there are other options as well, including some of the wood marquees, but this tutorial is a fast, easy, inexpensive option for those who just want something more decorative that won’t actually be turned on for several hours at a time. Hope that helps!
Question: Is there anything you need to make sure it doesn’t catch fire? I want to do one letter for my nursery but I don’t want it to be a fire hazard. Please let me know :)
I love this tutorial and all the pictures too! I recently picked a word for my girls room which was “ENCHANTED” and my boys now want a word done for their room…I will have to keep this in mind. My boys say they would like the word “EPIC”. They will think it was awesome if it lights up because they don’t have a lot of light in their room right now.
EPIC in marquee lights would be quite epic indeed, Crystal! How fun that would be!
I LOVE THIS! I’ve been meaning to make marquee letters for my wedding this coming November but hadn’t found a tutorial that seemed easy enough. I’m recruiting my fiance and am committing to making this ASAP. Thank you for sharing!
Thanks so much, Robin! Congratulations on your wedding — I hope the marquee works out well if you do decide to make it! If you are going to have it lit up for a while, consider using LED lights since they give off less heat. :)
Love this! What a fun idea. I pinned this for later. I’m not sure what I’d use this for, but I’m thinking I’ll find something!
Thanks for pinning it, MaryAnn!
Love the use of ready-made letters instead of having to cut out the letters and the sides!
I’m all about shortcuts that don’t skimp on style but save time! ;)
Great idea! What if your string of lights has more bulbs than your letters require?
Good question. You can leave the remaining bulbs off, then carefully twist the remaining string and tie to the back of the last letter!
thanks so much, Amy! ooh for you, Ms. Amazing Photographer, what about “click”…? ;) xo
What an adorable idea! I love it :)
Thanks, Melissa!
sooooo good! this is brilliant and so much fun! now i have to land on a word I’d like lit up…thank you. :)